Compaction testing is required in a lot of projects in Calgary and for a lot of good reasons. It improves overall build quality, ensures a consistent backfill material is used throughout the project (unless otherwise approved), prevents excessive settlement, and provides a stable subgrade for anything that needs to be built on it.
Contractors throughout Alberta and BC know that compaction is important and most know what they need to do to pass. Most of the time it just involves hitting the backfill more until the tester tells them it’s good. Sometimes it passes on the first try, other times on the fifth.
As geotechnical engineers we know that you don’t like failing tests, because it slows you down, and time is money. We don’t want to slow you down! We want you to pass on the first try too. After chatting with a few contractor friends about compaction testing, I decided I should write a quick guide for contractors wanting to speed up their compaction tests.
1. Use The Right Equipment
The compaction equipment you use during backfilling is very important and should be chosen based on the type of backfill material you are using.
If you’re using a coarse grained soil such as gravel or sand you want to use a vibratory drum roller or flat plate tamper.
If you’re backfilling with a fine grained soil such as a clay or silty clay, you will want a sheepsfoot / padfoot roller or hoe-packer.
A good geotechnical technician will immediately recognize if you are using the incorrect equipment and will notify you, but it never hurts to ask them to make sure you’ve identified the soil correctly and chosen the right equipment.
What happens if you don’t use the right equipment? You’ll probably never reach the compaction level you need and if you do, it will take a long time or you’ll need a way bigger machine than what is necessary.
2. Understand Your Proctor Curve
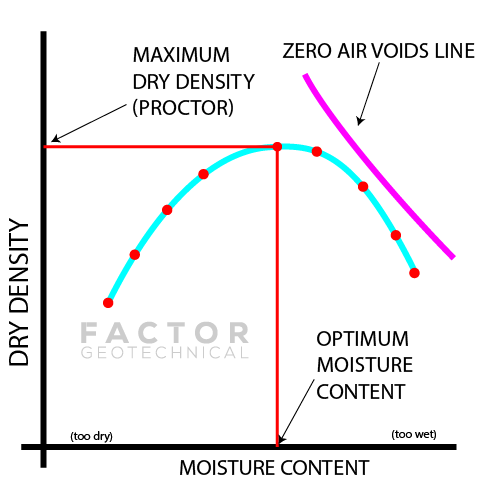
The Proctor test that is required prior to performing any compaction testing isn’t just a number. It tells you how your soil behaves depending on how much water is in it.
By understanding the Proctor curve we provide you prior to beginning work you will be able to add or remove water to your existing stockpile before you start working so that when you do begin, compaction testing will go much quicker.
The moisture content of the backfill you’re using is the most important soil characteristic that will affect how quickly you will reach acceptable levels of compaction.

In all of our Proctor reports we will include the Proctor density, optimum moisture content, and the moisture content of the sample from your site. If the moisture content of the initial sample is not within plus or minus 2% of the optimum, you can expect a more difficult time during compaction.
If you’re struggling to reach compaction and the technician on your site suggests adding or removing water, you should seriously consider this suggestion. We know adding and removing water takes time and can be expensive, so we don’t suggest it unless we feel its in your best interest.
3. Lift Thickness
We get it, thicker lifts mean less lifts, less work, less compaction, and more money in your pocket at the end of the project.
I can’t count the number of projects that I’ve worked on that insisted on using the cheapest and smallest packer that they could get their hands on while throwing in foot in a half lifts and not being able to pass a compaction test much to their frustration.
Use a lift thickness suitable to the equipment that you’ve got on site, even if the maximum lift thickness provided is higher.

We know that using a small lift thicknesses can add significant time to your project. That’s why my advice here is start small and work your way up. You’ll pass your initial tests faster, and we can work together to find a thicker lift height that works with your soil and the equipment that you’ve got on site.
4. Protect Your Backfill
As the Proctor test we’ve performed on your backfill is for that specific soil, any changes to your backfill material will affect our tests. Try your best to keep your stockpile separated from waste materials, organics, and other backfill materials. It doesn’t need to be perfect, but its another small thing that can save you time!
Keeping organics out of your backfill is especially important as the nuclear densometer used to test backfill interacts with carbon (organic) molecules in such a way that it will significantly change your results. A technician experienced in compaction testing will see when this is happening and tell you that you’ve got excessive organics which is never a good thing.
5. At A Glance
A quick checklist to help you out.
- You’ve got a Proctor test for each type of backfill on site
- None of your backfill stockpiles have been mixed with each other or with waste materials such as organics or debris
- Start with a small lift thickness and work your way up, especially if you’ve got a small compactor
- Keep the moisture content close to the optimum moisture content as specified in the Proctor
- Be willing to dry or wet the soil. We’ll only suggest this if it’s in your best interest!
- Use the correct type of compactor for your soil type.
- Clay – sheepsfoot or padfoot, hoe pack
- Gravel/Sand – flat plate, drum roller
Conclusion
That’s about it. Passing a compaction test is a team effort and Factor Geotechnical knows how frustrating it can be. We value your time and want your project to be a success.
If you’d like to try us out, give us a call or drop us a line at our contact page.

